Saturday, 27 April 2013

Week Fifteen - Sea Creature

This weeks task is to design a sea creature with the focus being on using real-world references to inform the design. Below is my reference sheet so far:


And  some quick 30min studies:

 A  frog - as i love  their throat sacs (?) as a design element and i'd like to incorporate them into my creature somehow And a fish that has human teeth, i thought this was very creepy so could be interesting - though it could end up looking a bit comical. I also eally like the skin texture on the human-teeth fish, lots of ripples and colour variation that will be good reference for when i paint my creature.

 I've started off by sketching out some sihlouettes to explore some shapes - using my reference sheet as inspiration. I've also tried to include the 'frog throat sac' into the designs in some way to see how i may be able to utilise it. I then took a few of them further into lines, very quickly, to see the possibiliies of the sihlouette and to help myself decide which i prefer.


P and Q were my favourites so very quickly squiggled in some black and white values to further explore their potential. I liked the salamander-esque body to 'Q' and the 6 legs, this one could have been very interesting to play around with the posing and allow that to influence the design.

I decided that 'P' would be the design to take to final. I liked the head design which could be quite memorable and alos the utilisation of the multiple sacs and the angel-fish inspired fins.


This is the final sheet for now. I would like to take the rendering further and also add in some extra shots to the sheet that would show the creature from more dynamic angles. The creature uses the sacs similar to how a frog does - to intimidate foes by making itself appear larger and also to attract a mate. Though the sacs are all over the back aswell as under the throat, with the addition of the extendable fins at the sides of the head and bubbles blowing from the nostrils. As shown in the left version.


Thursday, 25 April 2013

Topology Test 2

 
During todays session we had to model Nightcrawler, from the below reference. Using what we learned from the tutorial previously, focusing on workflow, edgeflow and topology.

I didn't take mine too far as i was concentrating on making my sihlouette and edge flow work well together, though there are some 5 sided shapes that i'm yet to clean up.


Week Fourteen - Minotaur

For this task we had to follow Glenn Southerns video upto video 5 and produce the same model that he goes through within the tutorial videos, focusing on the workflow (Simple shapes before refining) and the topology and edge flow.

There are quite a few areas after Video 3 where he uses a smooth function within Silo that i cannot find within maya - as maya's smooth function adds extra polys, silo's version smooths without any extra polys - this means that it became hard to make the model exact to his as he would use it a lot and the edge flow would change, sometimes, drasitically which would take too long to replicate without the smooth function.

Also at the start of section 4 he skips a small chunk at the start of the head so that was also an area that isn't exact to his mesh.

Other than that i'm quite pleased with the end result, i learned a lot about the workflow and the most valuable thing that i gained fom this was that you can be much more freeform with how you move the vertices around (by moving the center of the pivot at all axis, not just X, Y, Z) which allows for much quicker and intuitve experimentation, similar to how you would sculpt in Zbrush.


Thursday, 18 April 2013

Topology Test

We had to attempt to replicate this during the morning, to understand workflow and create good efficient topology. The reference images:

 
Below is my attempt, most of it is accurate apart from an extra edge loop that was accidently added to the arm which meant the shape is a little ibit different to the reference. And the neck / head is very roughly placed in as i ran out of time.


Wednesday, 20 February 2013

A Journey of Intrigue

 Concept for side street - nothing fancy perspective wise, really just wanted a perspective that wasn't distracting so that i could just focus on what materials i wanted, generally lighting colours and mood. Will do some more speedy sketches for atmosphere with better perspectives to continue to help give a better idea of the areas.


Thursday, 7 February 2013

World Building Week 13: Low Poly Character

There wasn't really a brief for this project, so i haven't been documenting the process.

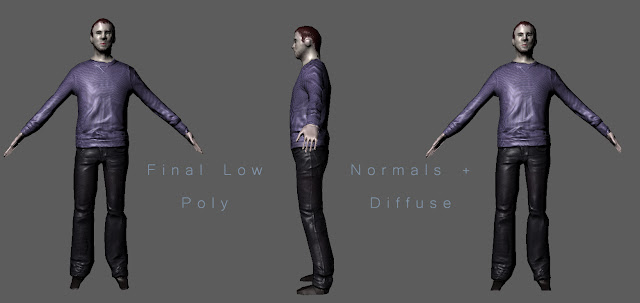
Here is the final low poly character. Over the weekend i intend to take it into Zbrush to refine the mesh.


Using my Zbrush start, i did a quick test of baking the hi-poly into normals and applying them to my low poly mesh. It works quite well, but will be better with a better colour paint and some tweaking.. and when i finish off my sculpt.


Re-visited my sculpt to finish off the head and i have also started to polypaint my model with base tones.


Here i UV mapped my mesh using Zbrushes 'UV Master' plugin and then added some quick photo textures to the diffuse. Here is the result in Maya, however if i get more time i will revisit the diffuse and texture it better. I also need to work on the hands and detail the ears, and shoes, but for now i am going to call this complete. I would like to place the mesh into UDK / Unity during gthe week to see how it looks in-game.


Edited some of the subdivisions so that it would animate better and added some more definition to the face (nose and lips). It's done for now.


15 min excercise:

Thursday, 24 January 2013

World Building Week 12: Large Weapon / Mech

This weeks theme is  to create a large weapon / mech. It must be hard surface and the final must be created in 3D with a paintover, like in the below video. Here is a checklist:

- Must be created in 3D.
- Paintover in photoshop to add all the details like nuts bolts, panels and logos.
- Must be textural and gritty.
The example video:


My references so far:


And here is a page of sihlouettes from today. I don't think i will do any more than these, i'll pick one to develop further so that i can get straight into 3D since the focus of this task is more so on the paintover. Also this weekend i've had to go back to Bristol so i've not had much access to my laptop so i am a few days behind.


Here is my final mech design, it's still quite quick (probably an extra 2 hours) and still considered a sketch, since it's not symmetrical and there are lots of undefined areas. However since i need to get this modelled in 3D quickly I'll jump straight in and fix those problems as i go. I've also tested out some decal ideas however  i should really do some more research into them for my final paintover.

(updated the sketch to refine the silhouette and added a sketch for the side to help with getting the posture and shape correct whilst modelling.)


Here is the start to my 3D mesh, i'm not entirely happy with it so far and may restart it. The approach i have taken is starting with a box and extruding out the faces and edges and then manipulating them into the right shape. However it may be best to start by blocking out large chunks and then refining them down using the insert edge loop tool, similar to how it is done in the video. I will try out this method and see which would work best.

As the purpose of my mesh is to be a base to paint over i am going to focus the details where they need to be (the plating, cannon) and then any underlying details i will just paint in as this will be quicker and more effective.


Another update, i made a rough darker object beneath the plating to act as the body which will have details added in photoshop. And also continued the mesh plating for the 'torso' area.

I'm feeling quite ill today (started on Monday) so my patience is wearing thin, here is a silly addition for the rest of the body... these obviously won't be the final mesh.


Still ill. Had a spike last night where i started being sick and it continued this morning. After resting i am feeling a bit better so continued work on this, decided to just build on top of the body parts i had before.


Another step, refining and detailing the gun:


Final WIP. Updated the hand, tweak other areas of the mesh, changed material colours of some plating on each object for added interest. This screenshot is in Max with the lighting set up that i will use for the final render.


This is the final render which consists of a perspective, font, back and side view. The lighting set up is Mental Ray and is 3 spot lights. A main in the top left corner which has shadows. An ambient in the bottom right colour which is dimmer to light the shadows (to simulate bounce light) and a very bright light at the back to create a rim light on the outer edge of my mech. I have rendered out different passes for each view (lighting, alpha, diffuse, shadow etc) which i will play around with for my final composit.

Lighten for the projector:


I'm still feeling pretty rough, but the days rest has helped a lot. I'm hoping to come into lesson tomorrow (though may be a little late..) and do the paintover in class. But i'll see how i feel in the morning, if i'm unable to come in i will just do the paintover at home and update the blog in the evening.

Though for now, i used the same techniques for my concept so hopefully that is enough to demonstrate my abilities.


..nearly finished.


annnnnnnd the final paintover..